Unlocking Lathe Mastery
The lathe is a cornerstone of precision machining, transforming raw material into functional components and intricate designs. Achieving mastery with this versatile machine, however, extends far beyond understanding its basic controls. It demands a deep appreciation for the interplay of cutting tools, robust tool holding systems, and an optimized shop environment. This comprehensive guide will equip you with the essential knowledge to elevate your lathe operations, from selecting the right tools and mastering challenging techniques like parting off, to establishing an efficient and safe workspace. By delving into the science behind cutting, the mechanics of holding, and the strategic setup of your workshop, you will unlock new levels of precision, efficiency, and creative potential, turning your lathe from a tool into an extension of your skill.
The Foundation of Precision Machining
At its heart, precision machining on a lathe relies on controlled material removal. This process is dictated by the cutting tool’s geometry, material composition, and how it’s presented to the workpiece. Understanding these fundamentals is the first step towards consistent, high-quality results. The global cutting tools market itself signifies the critical nature of these components, valued at USD 24.23 billion in 2024 [Intel Market Research, 2025]. This vast economic landscape underscores the importance of selecting and utilizing the right tools effectively.
Why Mastery Matters: Beyond Basic Operations
Mastery of lathe tooling is not merely about executing standard cuts; it’s about developing the intuition and knowledge to tackle complex geometries, achieve superior surface finishes, and optimize material removal rates. It’s about understanding why a particular tool performs best for a specific material or operation, and how subtle adjustments can yield dramatic improvements. For woodworkers and machinists alike, this deeper understanding translates directly into higher quality projects, reduced waste, and a more enjoyable and productive experience. As the CNC Lathe Machine Market continues its rapid ascent, projected to reach USD 18.78 billion by 2030 [VMR, 2024], the demand for skilled operators who can leverage advanced tooling and techniques will only grow.
What This Guide Covers: Tools, Holders, and an Optimized Lathe-Centric Shop Setup
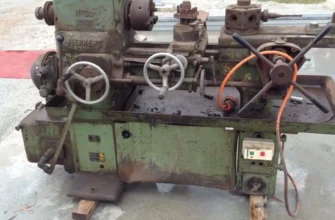
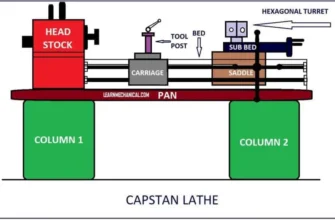
![]() The path to lathe mastery involves an integrated approach, balancing the selection of cutting tools, the stability of tool holders, and the efficiency of the shop setup.
The path to lathe mastery involves an integrated approach, balancing the selection of cutting tools, the stability of tool holders, and the efficiency of the shop setup.
This guide offers a holistic approach to lathe tooling mastery. We will dissect the anatomy of essential cutting tools, explore the intricacies of specialized parting tools, and demystify the crucial role of tool holders. Furthermore, we will guide you through creating a lathe-centric shop setup, optimizing your workspace for efficiency, safety, and superior machining outcomes. This integrated perspective is key to unlocking your lathe’s full potential.
Understanding Lathe Cutting Tools: The Foundation of Precision
The cutting tool is the most direct interface between your desired outcome and the raw material. Its design, material, and edge condition dictate the quality of the cut, the surface finish achieved, and the forces acting upon the workpiece and machine. A comprehensive understanding of these tools is non-negotiable for any serious lathe operator.
Common Lathe Tool Materials and Their Applications
The material from which a lathe tool is constructed is a primary determinant of its cutting performance, speed capabilities, and durability.
- High-Speed Steel (HSS): HSS is a workhorse for many applications, particularly in woodworking and general metalworking. It offers good toughness and is relatively easy to sharpen. HSS tools maintain their hardness at higher temperatures compared to carbon steels, allowing for faster cutting speeds. However, they can lose their cutting edge more quickly than other materials when subjected to extreme heat. HSS is ideal for a wide range of operations, including turning, facing, and boring, especially on softer metals and woods.
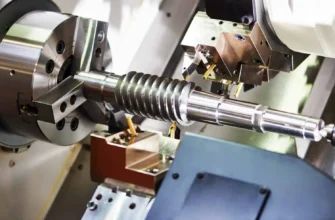
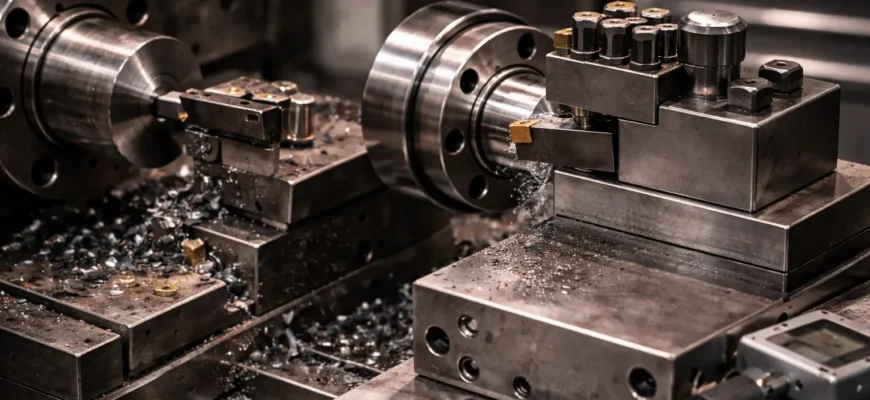
- Carbide (Tungsten Carbide): Carbide inserts and solid carbide tools offer superior hardness and wear resistance compared to HSS. This allows for significantly higher cutting speeds and longer tool life, particularly in demanding metalworking applications. The indexable segment of the cutting tools market, which heavily features carbide inserts, generated around USD 5.6 billion in revenue in 2024 [Allied Market Research, 2025], underscoring its prevalence. Carbide is exceptionally well-suited for machining harder steels, stainless steels, and abrasive materials where HSS would rapidly degrade. While more brittle than HSS, carbide’s ability to maintain a sharp edge under high thermal and mechanical stress makes it indispensable for production environments.
- Cobalt: Often found in HSS alloys (e.g., M42), cobalt enhances the red-hardness of the steel, meaning it retains its hardness at even higher temperatures than standard HSS. Cobalt-alloyed tools are excellent for machining tough, high-tensile strength alloys and work-hardening steels.
- Ceramic: Ceramic tools, often made from aluminum oxide or silicon nitride, possess extreme hardness and can operate at very high cutting speeds, producing excellent surface finishes. They are best suited for machining hard, brittle materials and cast iron, often without coolant. However, they are very brittle and can chip easily if subjected to shock or interrupted cuts.
- Diamond (Polycrystalline Diamond – PCD): The hardest known material, PCD tools are used for ultra-hard materials, abrasive composites, and high-volume production runs where extreme wear resistance is paramount. They offer exceptional tool life and surface finish but come at a premium cost and are typically used in specialized industrial settings.
Essential Lathe Operations and Corresponding Tool Types
Different lathe operations require specific tool geometries and configurations for optimal efficiency and finish.
- Turning: This involves reducing the diameter of a rotating workpiece.
- Roughing Tools: These have a strong, often rounded or chamfered cutting edge designed to remove material quickly. They prioritize material removal rate over surface finish.
- Finishing Tools: These feature sharp, finely honed edges with specific rake and clearance angles to produce a smooth surface finish. They typically remove less material per pass but leave a superior finish.
- Facing: This operation creates a flat surface perpendicular to the lathe’s axis of rotation. Facing tools are typically ground with a side-cutting edge and a nose radius or a square-ground tip. Proper angle and support are crucial to prevent chatter.
- Boring: This is the process of enlarging an existing hole or creating a new one within a rotating workpiece. Boring bars come in various lengths and diameters to reach into deep holes, and their cutting tips are ground for internal diameter reduction.
- Grooving (Parting is a form of grooving): Tools with a specific width and profile are used to cut grooves of a defined depth and shape into the workpiece. They require rigid setup to prevent deflection.
- Threading: Specialized tools with precisely ground profiles are used to cut external or internal threads. The geometry of the thread chaser or die must precisely match the desired thread form (e.g., Acme, Metric, Unified National).
Tool Geometry and Edge Preparation: The Science of Cutting
The angles and geometry of a cutting tool’s edge are critical to its performance. Understanding these elements allows you to select, grind, and use tools effectively.
- Rake Angles:
- Back Rake Angle: This is the angle of the tool face relative to a line perpendicular to the workpiece surface. Positive back rake directs the chip up and away from the cutting edge, reducing cutting forces and heat but potentially weakening the edge. Negative back rake angles the tool face towards the workpiece, strengthening the cutting edge and allowing for higher cutting speeds, but increasing cutting forces. Neutral back rake offers a balance.
- Side Rake Angle: Similar to back rake, but applied to the side of the tool. It influences chip flow and the direction of cutting forces.
- Clearance Angles:
- End Clearance Angle: This is the angle between the flank of the tool and the workpiece surface. It prevents the flank from rubbing against the workpiece, reducing friction and heat, and ensuring the cutting edge is the only part making contact.
- Side Clearance Angle: Similar to end clearance but on the side flank.
- Cutting Edge and Nose Radius: The sharpness and shape of the cutting edge are paramount. A sharp edge requires less force to cut, reducing heat and improving finish. The nose radius (the curve at the tip of the tool) influences surface finish and the tool’s ability to handle cornering and chatter. A larger radius is generally more robust but can lead to a rougher finish.
- Edge Preparation (Honing and Honing): Even after grinding, cutting edges benefit from honing. This involves removing the microscopic burr or feather left by the grinding process, creating a smooth, keen edge. For HSS tools, this can be done with fine grinding wheels or diamond stones. For carbide inserts, specialized honing techniques are often employed by manufacturers.
Practical Tool Selection: Matching the Tool to the Job
Selecting the correct tool involves considering several factors:
- Material Being Machined: Harder materials require harder tool materials (carbide, ceramics) and potentially shallower depths of cut. Softer materials are more forgiving with HSS.
- Operation: Roughing demands robust tools, while finishing requires sharp, precisely ground edges. Boring requires tools that can reach into holes.
- Machine Rigidity: A less rigid lathe may experience chatter with aggressive cuts, favoring smaller depths of cut and sharper, more refined tools, or tools with negative rake for edge strength.
- Desired Finish: For a mirror finish, fine-grained carbide or ceramic inserts with specific geometries and edge preparations are often necessary.
- Tool Holder Capability: The tool holder system must be able to securely grip the tool shank without deflection.
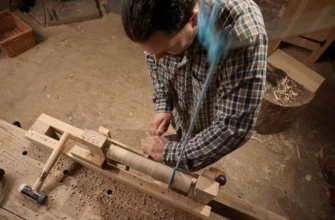
For woodworking, specialized HSS lathe turning tools like skew chisels, gouges, and scrapers are common. For metalworking, traditional brazed-tip tools and modern indexable carbide insert tooling are prevalent. The choice often depends on the user’s preference, the materials being worked, and the desired level of precision and efficiency.
Mastering Parting Tools: Overcoming Unique Challenges
Parting off, also known as cutting off, is the process of severing a finished part from the remaining stock on the lathe. It’s a critical operation that, if not executed correctly, can lead to wasted material, damaged parts, and safety hazards. The forces involved and the potential for the parting tool to bind make it a distinct challenge.
The Unique Mechanics of Parting Off
Parting tools have a narrow blade designed to cut a kerf into the workpiece. As the tool advances, it creates chips that must be cleared from the cut. The narrowness of the blade makes it susceptible to deflection, especially as the cut deepens and the leverage increases. This deflection can cause the cut to taper, bind the blade, or create uneven surfaces. Chip evacuation is also crucial; tightly packed chips can cause the tool to overheat, dull prematurely, or even break. The inherent rigidity of the lathe machine itself plays a significant role; a less rigid machine will amplify any tool deflection and vibration.
Types of Parting Tools and Inserts
Several types of parting tools are available, each with its advantages:
- Standard Parting Blades: These are typically made from HSS or spring steel and have a narrow blade with a slight taper or relief on the sides to facilitate chip clearance. They are often held in a dedicated parting tool holder. These are common in woodworking and general metalworking for smaller stock.
- Parting Tool Holders with Blades: These systems use a rigid blade that slides into a holder, allowing for easy replacement of worn or broken blades. The holder provides a more robust mounting.
- Carbide Insert Parting Tools: These systems utilize small, specifically shaped carbide inserts that are held in a robust steel body. The inserts are often designed with features to promote chip control and can be easily replaced. The rigidity and sharpness of carbide make these highly effective for demanding parting operations, especially in metals. The indexable segment’s strong market presence [Allied Market Research, 2025] reflects the utility of these systems.
Best Practices for Achieving Clean and Square Parting Cuts
Successful parting off relies on meticulous technique:
- Rigid Setup: Ensure the parting tool holder is firmly clamped in the tool post and the blade is seated correctly. Minimize any overhang of the blade from the holder.
- Accurate Tool Height: The cutting edge of the parting tool must be precisely at the center of the workpiece. Being above or below center will create an angled cut and increase the risk of binding or poor finish.
- Controlled Feed Rate: Advance the tool at a steady, consistent feed rate. Too fast a feed can cause chatter and overload the tool. Too slow can generate excessive heat.
- Correct Depth of Cut: For standard HSS blades, a common recommendation is to achieve approximately 2/3rds of the blade’s width into the workpiece before advancing further laterally. For carbide inserts, follow manufacturer recommendations, as they can often cut deeper per pass due to their rigidity.
- Chip Clearance: If chips are not clearing, a slight side-to-side or up-and-down motion of the tool can help, but this must be done with extreme care to avoid damaging the cut. Some specialized inserts have geometry designed for improved chip evacuation.
- Support for Long Parts: For longer workpieces, the unsupported end can sag, causing the parting cut to be angled. Using a steady rest near the parting point can provide crucial support.
- Finishing Pass: Often, a final light finishing pass with a sharp tool can clean up any burrs or imperfections left by the initial cut.
- Coolant (for metalworking): Using an appropriate metalworking fluid can significantly reduce heat, improve tool life, and help flush away chips. The global Metalworking Fluids Market, valued at USD 12.50 Billion in 2024 [Exactitude Consultancy, 2024], highlights the importance of these consumables.
Troubleshooting Common Parting Issues
- Blade Binds or Breaks: Likely caused by excessive deflection, improper tool height, inconsistent feed, or chips not clearing. Ensure the tool is sharp, at center height, and advance steadily. Check for workpiece sag.
- Tapered Cut: The tool is likely deflecting. This can be due to a lack of rigidity, a dull tool, or advancing too far into the material without sufficient blade width.
- Rough Surface Finish: The tool edge is likely dull, chipped, or the feed rate is too high. Honing the tool or using a fresh insert is required.
- Chatter: Caused by vibration. Ensure the tool is rigidly held, the workpiece is securely gripped, and the lathe itself is stable. A slower feed rate or a different tool geometry might be needed.
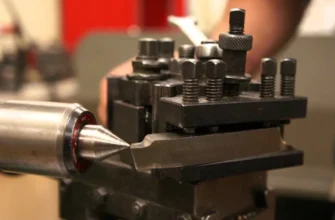
Tool Holders: The Critical Interface for Performance and Repeatability
While cutting tools are the agents of material removal, tool holders are the unsung heroes that translate the machine’s power into precise action. They provide the means to securely mount, accurately position, and rigidly support the cutting tool. A robust tool holding system is paramount for achieving consistent results, extending tool life, and ensuring operator safety.
The Importance of a Robust Tool Holding System
A secure tool holder ensures several critical factors:
- Rigidity: It minimizes deflection of the cutting tool under cutting forces. This is essential for maintaining dimensional accuracy and preventing chatter.
- Repeatability: For operations requiring multiple identical parts, a tool holder system that allows for quick and precise tool changes without re-calibration is invaluable.
- Tool Life: By providing a stable platform and proper alignment, tool holders prevent premature wear or damage to the cutting edge.
- Accuracy: Proper alignment of the tool holder with the lathe’s axis of rotation is fundamental for achieving correct geometry and dimensions on the workpiece.
Common Lathe Tool Holder Systems
Lathes employ various systems for holding tools:
- The Fixed Tool Post (South Bend Style): A simple, often wedge-shaped post that holds tools directly. While common on older or smaller lathes, it requires manual adjustment for different tool heights and tool changes, leading to less repeatability.
- Quick-Change Tool Post (QCTP) Systems: These are a significant upgrade. A base mount is attached to the lathe’s cross slide, and various tool holder “stations” can be quickly and accurately locked into place. This allows for rapid tool changes and precise re-engagement to the same position, crucial for efficient production and complex setups. Systems like Aloris, Dorian, and various Asian-manufactured equivalents are popular.
- Turret Lathes and Milling/Drilling Attachments: More advanced lathes or those with specialized attachments might use multi-tool turrets or holders designed for specific operations like drilling or milling that can be integrated into the lathe’s spindle or tailstock.
Selecting the Right Tool Holder for Your Lathe and Operations
The choice of tool holder depends on:
- Lathe Size and Capacity: The holder must be proportioned to the lathe’s tool post opening and overall rigidity.
- Type of Operations: For general turning and facing, a basic QCTP station might suffice. For repetitive operations like parting or threading, a dedicated holder within a QCTP system is ideal.
- Tooling Type: Some holders are designed for single-body tools, while others are specifically for indexable inserts.
- Desired Precision and Speed of Change: If frequent tool changes or high precision are required, a QCTP system is a clear choice.
When selecting tool holders for indexable inserts, ensure they provide secure clamping of the insert, preventing movement during cutting. The clamping mechanism (e.g., screw clamp, top clamp, wedge clamp) impacts the insert’s stability and the overall rigidity of the cutting system.
Mounting, Alignment, and Calibration Best Practices
Proper installation is critical for optimal performance:
- Cleanliness: Ensure the tool post, tool holder, and any mating surfaces are free of dirt, chips, and cutting fluid residue.
- Secure Clamping: Tighten tool holders firmly in their respective stations or the tool post. For QCTPs, ensure the locking mechanism is fully engaged.
- Tool Height Alignment: This is paramount. The cutting edge of the tool must be precisely at the center height of the lathe’s spindle. Use shims if necessary to achieve perfect alignment.
- Zeroing (for CNC and repetitive manual operations): If precision is critical, establish a clear zero point or reference for your tool. This might involve touching the tool tip to a reference surface or using a tool presetter. For manual lathes, this often involves carefully setting the cross-slide and compound slide dials.
- Angle and Lead: Adjust the tool holder to achieve the correct lead angle for the operation. For example, turning tools are often set with a slight negative lead angle.
- Regular Checks: Periodically re-check tool height and alignment, especially after heavy use or tool changes.
A well-maintained and correctly set up tool holder system is the bedrock of precise and efficient lathe work, ensuring that your cutting tools perform at their peak potential.
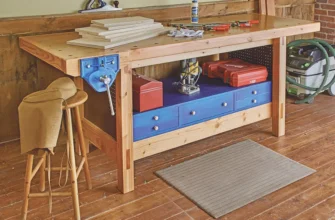
Lathe-Centric Shop Setup: Optimizing Your Workspace for Mastery
Your workshop is not just a place to store your machines; it’s an environment that directly influences your productivity, safety, and the quality of your work. For lathe operations, a dedicated, well-organized shop layout is crucial. This section focuses on creating a workshop environment specifically tailored for lathe work, integrating elements like workbench setup, tool storage, and effective dust collection.
Strategic Shop Layout and Workflow for Lathe Operations
A successful shop layout is built around workflow, not just machine placement. Consider how materials enter your space, how they move through the machines, and where finished tools or parts exit.
- Machine Placement: Position the lathe for optimal access. Ensure ample space around it for material handling, tool changes, and safe operation. Consider the direction of chip ejection – you don’t want chips flying into sensitive areas or creating trip hazards.
- Material Staging: Designate an area near the lathe for incoming raw material and a separate area for finished or partially completed parts. This prevents clutter around the machine.
- Tool Access: Keep frequently used tools, measuring instruments, and cutting fluids within easy reach. This minimizes wasted movement and time.
- Clearances: Allow sufficient space for opening lathe doors, tailstock operation, and even for using larger workpieces or attachments.
- Workflow Direction: Aim for a linear or U-shaped flow if possible, moving from raw material to finished product without backtracking.
Dedicated Lathe Tool Storage and Organization
Efficient tool storage is vital. Disorganized tools lead to lost time, damaged edges, and frustration.
- Tool Cabinets and Drawers: For metalworking, a good set of drawers or a storage cabinet with foam cutouts or dividers is ideal for organizing indexable inserts, tool holders, boring bars, and specialty tools. Ensure drawers slide smoothly and can support the weight of tooling.
- Pegboards: Useful for hanging HSS turning tools, measuring devices like calipers and micrometers, and other frequently accessed items. Ensure tools are hung securely.
- Shelving: Sturdy shelves are necessary for storing larger stock materials, workpiece blanks, and larger accessories.
- Tool Holders: Keep your various tool holders organized. A QCTP system often comes with stations that can be stored, or you can create dedicated slots or racks for them.
- Sharpening Station: If you sharpen HSS tools, designate a specific area with the necessary grinding wheels, diamond stones, and a honing guide. Proper sharpening is key to maintaining tool performance.
Lathe-Specific Chip and Dust Management
Lathes, particularly in woodworking, generate significant chips and dust. Effective management is crucial for safety, health, and finishing quality.
- Dust Collection System: A robust dust collection system is non-negotiable for woodworking. Connect your lathe directly to a dust collector or use a specialized lathe dust collection attachment. This reduces airborne particles, improves visibility, and contributes to a cleaner workshop environment. Look for systems with adequate airflow and filtration (e.g., a separator for fine dust).
- Chip Pans and Guards: Metalworking lathes typically have chip pans to catch metal shavings. Ensure these are in place and emptied regularly. Splash guards can help contain flying chips and coolant.
- Shop Vacuum: A powerful shop vacuum with appropriate attachments is invaluable for cleaning up chips and dust from the machine, workbench, and floor. Regular cleaning prevents build-up that can interfere with machine operation or become a hazard.
Lighting, Ergonomics, and Accessibility
A well-lit and ergonomically designed workspace enhances comfort, safety, and precision.
- Lighting: Good lighting is essential for accurate work. Ensure adequate overhead ambient lighting, supplemented by task lighting directly focused on the lathe’s cutting area and control panel. This helps in seeing fine details, tool engagement, and surface finish.
- Workbench: A sturdy workbench is crucial. Its height should be comfortable for prolonged operation, allowing you to stand or sit without undue strain. Ensure it’s stable enough to support tooling or jigs.
- Accessibility: Maintain clear pathways around the lathe and workbench. Ensure all controls, storage areas, and safety equipment are easily accessible.
Safety First: Essential Lathe Shop Setup Considerations
Safety must be integrated into every aspect of your shop setup.
- Personal Protective Equipment (PPE): Always have safety glasses or a face shield readily available. Hearing protection and dust masks or respirators are essential depending on the operation and materials.
- Emergency Stop: Ensure your lathe has an easily accessible emergency stop button.
- Guards: Never remove safety guards from the machine.
- Fire Extinguisher: Keep an appropriate fire extinguisher (e.g., Class ABC) nearby, especially when working with flammable materials or cutting fluids.
- Electrical Safety: Ensure all wiring is up to code and grounded. Use appropriate clamps or fasteners to secure workpieces and tools, preventing unexpected movement.
- Operator Training: Understand your lathe’s specific safety features and operating procedures. The increasing automation in manufacturing, with global robot density reaching 162 units per 10,000 employees in 2024 [International Federation of Robotics, 2024], highlights a broader trend toward safety and precision in industrial settings.
Achieving Mastery: Integrating Tools, Holders & Setup for Superior Results
True lathe tooling mastery is not achieved by focusing on individual components in isolation. It emerges from understanding how the tools, holders, and the shop setup work in synergy to produce exceptional results.
The Synergy of the Lathe Ecosystem
Consider this: a perfectly ground HSS tool is rendered ineffective by a flimsy, poorly aligned tool holder. Similarly, even the best tool holder cannot compensate for a cluttered workshop where access to controls or materials is compromised. The machines, the tools, the holders, and the space all form an interconnected ecosystem.
- Tool Choice Influences Holder and Setup: Using advanced carbide inserts for high-speed metal cutting demands a rigid QCTP system capable of withstanding higher forces and maintaining precise indexing. This, in turn, necessitates a stable workbench and robust chip management.
- Setup Enhances Tool Performance: An optimized shop layout that minimizes travel time between material staging and the lathe allows for more focused attention on the cutting operation itself, leading to better finishing and fewer errors. Effective dust collection ensures that the air is clear, allowing for better visibility of the cutting edge and the workpiece surface, which is vital for achieving a clean finish.
- Holder Choice Dictates Tooling Options: The type of tool post on your lathe dictates what types of tool holders and, consequently, what types of tools you can effectively use. Investing in a good Quick-Change Tool Post system opens up a wider array of precise and repeatable tooling options.
The integration of artificial intelligence in manufacturing, with over 77% of manufacturers implementing it [Rootstock Software / Researchscape, 2025], points to a future where smart systems optimize these interactions further, predicting tool wear, adjusting parameters, and ensuring maximum efficiency. Understanding the fundamentals allows you to better leverage such advancements when they become available.
Troubleshooting Common Machining Issues
When faced with persistent problems, it’s essential to consider the entire lathe ecosystem:
- Excessive Vibration (Chatter):
- Tool: Dull edge, incorrect geometry, chipped edge.
- Holder: Loose tool holder, tool not seated properly, excessive tool overhang.
- Setup: Loose lathe headstock or tailstock, unstable workbench, workpiece not securely mounted, material issues.
- Poor Surface Finish:
- Tool: Dull, chipped, or incorrect tool type for the material/operation.
- Holder: Tool not at center height, loose clamping causing micro-movements.
- Setup: Inconsistent feed rate, insufficient coolant (for metalworking), excessive dust or debris on the workpiece.
- Dimensional Inaccuracy:
- Tool: Worn cutting edge, incorrect tool geometry.
- Holder: Tool not properly zeroed or aligned, play in the tool holder system.
- Setup: Inaccurate measurements, loose clamps on the workpiece, machine not properly calibrated, sagging workpiece.
By systematically evaluating each component – the tool, the holder, and the shop setup – you can diagnose and resolve even complex machining challenges.
Continuous Improvement and Learning
The pursuit of lathe tooling mastery is an ongoing journey. The landscape of tools, machines, and techniques is constantly evolving.
- Practice Regularly: Consistent use of your lathe is the best way to build skill and intuition. Experiment with different tools and techniques on scrap material.
- Seek Knowledge: Read books, watch tutorials, attend workshops, and engage with other woodworkers and machinists. Learn about new materials and tooling advancements, such as the potential of metal tooling in additive manufacturing [MDPI, 2024].
- Sharpen Your Skills: If you use HSS tools, commit to regular and precise sharpening. A sharp tool is a safe tool and a precise tool.
- Refine Your Setup: Periodically review your shop layout, tool storage, and dust collection systems. Look for areas where efficiency or safety can be improved. Consider how your workbench height or lighting might be optimized.
- Embrace Challenges: Don’t shy away from difficult operations like intricate finishing or precise parting. These challenges are opportunities for growth.
What’s Next?
This guide has provided a comprehensive overview of lathe tooling mastery, covering the essential cutting tools, the intricacies of parting tools, the critical role of tool holders, and the strategic importance of an optimized lathe-centric shop setup. You have learned about different tool materials, the science behind tool geometry, best practices for achieving clean cuts, the importance of rigid holding, and how to design a workshop that enhances productivity and safety.
By understanding the synergy between these elements—how precise tools require secure holders, and how both perform best within a well-organized space—you are now equipped to approach your lathe operations with a newfound depth of knowledge and skill. The continuous evolution of manufacturing, including the increasing adoption of advanced technologies, emphasizes the value of mastering these fundamental principles.
Your immediate next steps should focus on applying this knowledge:
- Assess Your Current Tooling: Review your existing cutting tools. Are they sharp? Do you have the right types for your typical operations? Consider upgrading or investing in specialized tools for specific tasks.
- Evaluate Your Tool Holders: Examine your tool holding system. Is it rigid and repeatable? If you are using a basic tool post, consider upgrading to a Quick-Change Tool Post system for significant improvements in efficiency and accuracy.
- Optimize Your Workspace: Walk through your workshop. Is your shop layout conducive to a smooth workflow? Is your tool storage organized and accessible? Is your dust collection system effective? Make small, incremental improvements to your space based on the principles discussed.
- Practice Precision Parting: If you haven’t already, dedicate time to practicing clean and square parting-off cuts on scrap material. Focus on technique and consistent feed rates.
- Prioritize Safety: Ensure all safety guards are in place, your PPE is readily available, and your shop has appropriate fire safety measures.
Embracing these steps will not only enhance your current capabilities but also lay the groundwork for continuous learning and refinement. The path to lathe tooling mastery is one of ongoing practice, informed decision-making, and a deep appreciation for the interconnectedness of your machines, tools, and workshop.